
 Data Structure
 Networking
 RDBMS
RDBMS Operating System
 Java
Java MS Excel
 iOS
iOS HTML
HTML CSS
CSS Android
 Python
 C Programming
 C++
C++ C#
C# MongoDB
 MySQL
MySQL Javascript
 PHP
PHP
- Selected Reading
- UPSC IAS Exams Notes
- Developer's Best Practices
- Questions and Answers
- Effective Resume Writing
- HR Interview Questions
- Computer Glossary
- Who is Who
What is Prop Drilling and How to Avoid It
Prop Drilling is a common mistake beginners make while building React apps. It can cause reduced code readability and even performance issues for the app. In this article, I will explain what are props, prop drilling, and how to avoid prop drilling using context APIs.
Table of Content
Prerequisites
- Good knowledge of React, useState Hook, and useContext Hook.
- Basic understanding of React Props, state management, and context API
What are Props?
In React, props (stands for properties) are arguments passed to react components. Props are used to transfer data from parent component to child component. Following are key features of props.
- Unidirectional Data Flow: Using props data can only passed from parent component to child component. Reverse is not possible.
- Read-Only Data: Props are read-only, meaning data coming from parent component cannot be changed by child component.
- Support Any Datatype: Props can be used to send any type of data such as javascript objects, arrays, functions, and variables.
Example
In the following code, we defined a React component called "Greeting" which accepts a prop object from a parent component. A greeting message will be displayed for the name passed through prop.
const Greeting = (props) => {
  return <h1>Hello, {props.name}!</h1>;
};
The code below is parent component for above child component. It calls the child component with name as an argument ( the prop ).
const App = () => {
    return <Greeting name="Tutorialspoint" />;
};
Output of this code will be "Hello, Tutorialspoint" printed in h1 tag.
Prop Drilling
Prop Drilling is the process of passing data(props) from parent component to a deeply nested child component in a React application. This process involves passing data through multiple intermediary components to reach final child component. The intermediary components may not use this data, and may only serve duty of passing to child component. Although this is a straightforward approach, it can make the codebase harder to maintain and scale. For example, changes in the data structure or components may require updates in all intermediate levels.
Example
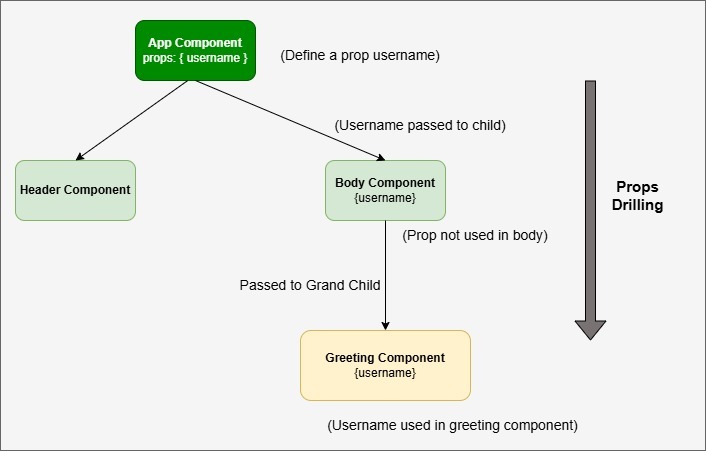
Imagine a scenario, where we have three components, App Component, Body Component and Greeting Component. Body Component is child of App Component and Greeting Component is child of Body Component.
In code below, the "App" component passes the "username" prop to it's child, "BodyComponent".
const App = () => {
    return <BodyComponent username="Farhan" />;
};
The "BodyComponent" receives the "username" prop and passes it down to the "GreetingComponent". Note that, "BodyComponent" is not using this prop for itself.
const BodyComponent = (props) => {
    return <GreetingComponent username={props.username} />;
};
Finally, GreetingComponent displays the name withthe greeting.
const GreetingComponent = (props) => {
    return <h4>Hello, {props.username}!</h4>;
};
The image below shows graphical overview of above scenario.
Why to Avoid Prop Drilling?
Prop drilling is a brute force approach to pass data from parent components to grand child components. It can cause the following issues.
- Performance Issues: Prop drilling results in performance issues as data has to pass through multiple intermediary components to reach final component.
- Code Maintenance: Prop drilling makes the code harder to maintain because changes in the data structure or components require updates across all levels of the component tree.
- Reduce Component Reusability: Components used in prop drilling become tightly coupled to parent components which reduce their reusability and make the application harder to scale.
- Reduce Code Readability: It can clutter the code and make it less readable, especially when dealing with deeply nested components.
Fix Prop Drilling With Context API
Follow the steps below to prevent prop drilling. This method uses Context API to create a context to share data between components without needing to explicitly pass props through every level of the component tree.
Step 1: Create a Context
First, we need to import necessary modules and components to the main App.js component. Then we define a new context using "createContext()" module of React. This context will hold the data we want to share across your components.
// App.js file

import React, { createContext, useState } from 'react';
import './App.css';
import ChildComponent from './components/childComponent';

// Create a context and export it
export const MyContext = createContext();
Step 2: Provide the Context Value
Next, wrap the components that need access to the shared data with a "Context.Provider" component. This component will provide value to all the child components that consume this context.
//App.js file continues..

function App() {
  const [value, setValue] = useState('This is initial value set by App Component');

  return (
    {/* value and setValue will be shared as context */ }
    <MyContext.Provider value={{value, setValue}}>
        <div app="appComponent" >
            <h1>App Component</h1>
            <p>Context Value: {value}</p>
            <ChildComponent />
        </div>
    </MyContext.Provider>
  );
}

export default App;
Step 3: Define an Intermediate Component
In intermediate child component we will not use context shared from App component. We will only call NestedChild component from this component.
//ChildComponent.js file

import React from 'react';
import NestedChild from './nestedChild';

function ChildComponent() {
  return (
    <div className="childComponent">
      <h2>Child Component</h2>
      <NestedChild />
    </div>
  );
}

export default ChildComponent;
Step 4: Use the Shared Data in Nested Components
Now in nested child component, we will use context shared by App component. For this, first we need to import the context we declared in App component and useContext hook. With this "useContext" hook store context value to two variables ( value and setValue). 'value' will be used to display current value and 'setValue' will be used to change value. See the code below.
//NestedChild.js file

import React, { useContext } from 'react';
import { MyContext } from '../App'; // Import the context

function NestedChild() {
    // Consume the context value
    const { value, setValue } = useContext(MyContext);

    return (
        <div className="nestedChild">
        <h3>NestedChild Component</h3>

        {/* Display the context value in nested child*/}
        <p>Context Value: {value}</p>

        {/* Define new value for shared context */}
        <button onClick={ () =>
                  setValue("Value Changed by Nested Child")
            }>
            Update Context
        </button>
        </div>
     );
}
export default NestedChild;
Step 5: Add Styling to Components
Finally, we will apply some CSS styling to all the components to make is visible to our eyes. Paste this code in App.css file
/* App.css File */
   .appComponent, .childComponent, .nestedChild{
        border: 2px solid;
        display: flex;
        flex-direction: column;
        padding: 10px;
        justify-content: center;
        align-items: center;
    }

    h1 {
        font-size: 2.5rem;
        color: #2f855a; /* Greenish theme */
        margin-bottom: 20px;
    }

    p {
        font-size: 1.2rem;
        color: #555;
        margin-bottom: 30px;
    }

    button {
        padding: 10px 20px;
        background-color: #38a169; /* Green button */
        border-radius: 5px;
    }

    button:hover {
        background-color: #2f855a; /* Darker green on hover */
        transform: scale(1.05); /* Slight zoom effect */
    }
Output
This is output. You can see that string declared in App component is available at the nestedChild component and also it can be edited from nestedChild component.

148 Views
