- PyQt - Home
- PyQt - Introduction
- PyQt - Environment
- PyQt - Hello World
- PyQt - Major Classes
- PyQt - Using Qt Designer
- PyQt - Meta Objects
- PyQt Signals & Slots
- PyQt - Signals and Slots
- PyQt - Support and Signals
- PyQt - Unbound and Bound Signals
- PyQt - New Signals with PyQtSignal
- PyQt - Connecting, Disconnecting, & Emitting Signals
- PyQt - Slot decorator
- PyQt - Slot Connection
- PyQt Layouts
- PyQt - Layout Management
- PyQt - QBoxLayout
- PyQt - QGridLayout
- PyQt - QFormLayout
- PyQt - QHBoxLayout
- PyQt - QVBoxLayout
- PyQt - QStackedLayout
- PyQt - QGraphicsGridLayout
- PyQt - QGraphicsAnchorLayout
- PyQt - QGraphicsLayout
- PyQt - QGraphicsLinearLayout
- PyQt Basic Widgets
- PyQt - Basic Widgets
- PyQt - Qlabel Widget
- PyQt - QLineEdit Widget
- PyQt - QPushButton Widget
- PyQt - QRadioButton Widget
- PyQt - QCheckBox Widget
- PyQt - QComboBox Widget
- PyQt - QSpinBox Widget
- PyQt - QMessageBox
- PyQt - QDialogButtonBox Widget
- PyQt - QFontComboBox Widget
- PyQt - QDoubleSpinBox Widget
- PyQt - QToolBox Widget
- PyQt - QMenuBar, QMenu & Qaction Widgets
- PyQt - QToolTip
- PyQt - QInputDialog Widget
- PyQt - QFontDialog Widget
- PyQt - QDialog Widget
- PyQt - QFileDialog Widget
- PyQt - QTab Widget
- PyQt - QSplitter Widget
- PyQt - QDock Widget
- PyQt - QStatusBar Widget
- PyQt - QTabBar
- PyQt - QList Widget
- PyQt - QScrollBar Widget
- PyQt - QProgressBar
- PyQt - QCalendar Widget
- PyQt - QMessageBox Widget
- PyQt - QPlainTextEdit
- PyQt - QDateEdit
- PyQt - QDateTimeEdit
- PyQt - QTimeEdit
- PyQt - QTextEdit
- PyQt - QTextBrowser
- PyQt - QScrollArea
- PyQt - Drag and Drop
- PyQt - Multiple Document Interface
- PyQt - QDialog Class
- PyQt Views
- PyQt - QColumnView
- PyQt - QTableView
- PyQt Drawing API
- PyQt - Drawing API
- PyQt - Drawing a Line
- PyQt - Drawing a Rectangle
- PyQt - Drawing a Triangle
- PyQt - Drawing a Circle
- PyQt - Drawing a Ellipse
- PyQt - Drawing a Polygon
- PyQt - Geometric Transformation
- PyQt - Drawing Effect
- PyQt Groups
- PyQt - QButtonGroup
- PyQt - QGroupBox
- PyQt Effects
- PyQt - Effects
- PyQt - Opacity Effect
- PyQt - QGraphicsBlur Effect
- PyQt - QGraphicsColorize Effect
- PyQt - QGraphicsDropShadow Effect
- PyQt Events
- PyQt - Event Handling
- PyQt - Drag & Drop Events
- PyQt - File Open Event
- PyQt - Action Event
- PyQt - Hide Event
- PyQt - Resize Event
- PyQt Database
- PyQt - Database Handling
- PyQt Essentials
- PyQt - BrushStyle Constants
- PyQt - QClipboard
- PyQt - QPixmap Class
- PyQt Useful Resources
- PyQt - Quick Guide
- PyQt - Useful Resources
- PyQt - Discussion
PyQt - Drawing Effects
A drawing effect refers to various styles that are used to create a visual impact on drawing. It could involve gradient, shading, image, or other method that enhance the appearance of artwork over texture.
QPixmap Class
The QPixmap class in Qt refers to off_screen image representation which handles the image data. It can be used as a QPaintdevice object or we can say, loaded into another widget.
Following key points for QPixmap class over gradient and image −
- We can fill the color of pixmap with a specific color using fill(color).
- Create QLinearGradient to define the gradient effect.
- Insert correct path to the image file and handle the error.
- Ensure that the application must enter the Qt event loop to handle the events.
Drawing a Gradient in PyQt
A gradient is defined using transformation of color progresses from origin to end. A gradient can be achieved through layer or selection, and create a smooth transition from one layer to another. For example − In Machine Learning gradient plays a vital role in training the model.
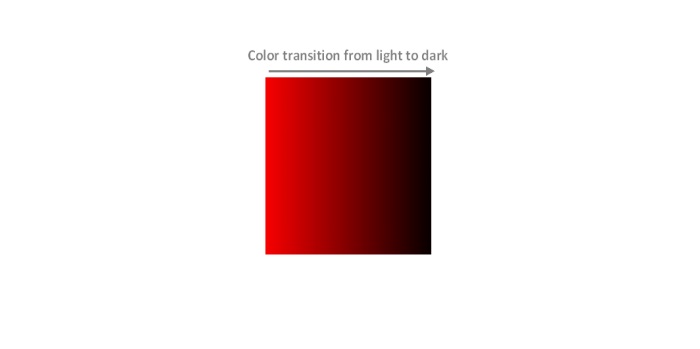
The QGradient class arrangement of QBrush to specify gradient fills. In addition, Qpen uses all its convenience classes and object to set the gradient effect on container.
Example
Following example illustrate the code of drawing gradient.
from PyQt5 import QtWidgets, QtGui, QtCore
from PyQt5.QtGui import QPainter, QPen, QBrush, QLinearGradient

class MyWidget(QtWidgets.QWidget):
   def paintEvent(self, event):
      painter = QPainter(self)
      painter.setPen(QPen(QtCore.Qt.green, 5, QtCore.Qt.SolidLine))
      grad = QLinearGradient(90, 50, 30, 10)
      painter.setBrush(QBrush(grad))
      painter.drawRect(10, 10, 200, 200)

app = QtWidgets.QApplication([])
widget = MyWidget()
widget.show()
app.exec_()
Output
The above code produces the following result −

Drawing an image in PyQt
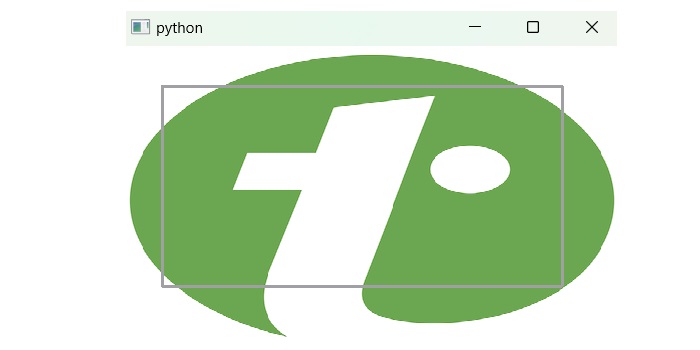
Drawing on images is very simple in PyQt. The drawing of any shape over an image elevates the new painting as an output result. Below the figure drawn rectangle shape over an image −
Following step to perform the task of drawing geometric figure over an image −
Step 1 − Start creating object with QPainter.
Step 2 − Set the path of image using QPixmap() method.
Step 3 − Display the image window which we used for the method drawPixmap().
Step 4 − Set the line color and style for rectangle using setPen().
Step 5 − Using drawRect() draw a rectangle and it will drawn up on the middle of the image.
Example
In this example, we demonstrate the code to draw the geometrical shapes over images using PyQt.
import sys
from PyQt5.QtWidgets import *
from PyQt5.QtGui import *
from PyQt5.QtCore import *

class Example(QWidget):
   def __init__(self):
      super().__init__()
      self.setGeometry(30, 30, 500, 300)
   def paintEvent(self, event):
      painter = QPainter(self)
      pixmap = QPixmap("C:/Users/Lenovo/Downloads/tutorialspoint.png")
      painter.drawPixmap(self.rect(), pixmap)
      pen = QPen(Qt.gray, 3)
      painter.setPen(pen)
      painter.drawRect(40, 40, 400, 200)
if __name__ == '__main__':
   app = QApplication(sys.argv)
   ex = Example()
   ex.show()
   sys.exit(app.exec_())
Output
On executing the code, we observed that −