- PyQt - Home
- PyQt - Introduction
- PyQt - Environment
- PyQt - Hello World
- PyQt - Major Classes
- PyQt - Using Qt Designer
- PyQt - Meta Objects
- PyQt Signals & Slots
- PyQt - Signals and Slots
- PyQt - Support and Signals
- PyQt - Unbound and Bound Signals
- PyQt - New Signals with PyQtSignal
- PyQt - Connecting, Disconnecting, & Emitting Signals
- PyQt - Slot decorator
- PyQt - Slot Connection
- PyQt Layouts
- PyQt - Layout Management
- PyQt - QBoxLayout
- PyQt - QGridLayout
- PyQt - QFormLayout
- PyQt - QHBoxLayout
- PyQt - QVBoxLayout
- PyQt - QStackedLayout
- PyQt - QGraphicsGridLayout
- PyQt - QGraphicsAnchorLayout
- PyQt - QGraphicsLayout
- PyQt - QGraphicsLinearLayout
- PyQt Basic Widgets
- PyQt - Basic Widgets
- PyQt - Qlabel Widget
- PyQt - QLineEdit Widget
- PyQt - QPushButton Widget
- PyQt - QRadioButton Widget
- PyQt - QCheckBox Widget
- PyQt - QComboBox Widget
- PyQt - QSpinBox Widget
- PyQt - QMessageBox
- PyQt - QDialogButtonBox Widget
- PyQt - QFontComboBox Widget
- PyQt - QDoubleSpinBox Widget
- PyQt - QToolBox Widget
- PyQt - QMenuBar, QMenu & Qaction Widgets
- PyQt - QToolTip
- PyQt - QInputDialog Widget
- PyQt - QFontDialog Widget
- PyQt - QDialog Widget
- PyQt - QFileDialog Widget
- PyQt - QTab Widget
- PyQt - QSplitter Widget
- PyQt - QDock Widget
- PyQt - QStatusBar Widget
- PyQt - QTabBar
- PyQt - QList Widget
- PyQt - QScrollBar Widget
- PyQt - QProgressBar
- PyQt - QCalendar Widget
- PyQt - QMessageBox Widget
- PyQt - QPlainTextEdit
- PyQt - QDateEdit
- PyQt - QDateTimeEdit
- PyQt - QTimeEdit
- PyQt - QTextEdit
- PyQt - QTextBrowser
- PyQt - QScrollArea
- PyQt - Drag and Drop
- PyQt - Multiple Document Interface
- PyQt - QDialog Class
- PyQt Views
- PyQt - QColumnView
- PyQt - QTableView
- PyQt Drawing API
- PyQt - Drawing API
- PyQt - Drawing a Line
- PyQt - Drawing a Rectangle
- PyQt - Drawing a Triangle
- PyQt - Drawing a Circle
- PyQt - Drawing a Ellipse
- PyQt - Drawing a Polygon
- PyQt - Geometric Transformation
- PyQt - Drawing Effect
- PyQt Groups
- PyQt - QButtonGroup
- PyQt - QGroupBox
- PyQt Effects
- PyQt - Effects
- PyQt - Opacity Effect
- PyQt - QGraphicsBlur Effect
- PyQt - QGraphicsColorize Effect
- PyQt - QGraphicsDropShadow Effect
- PyQt Events
- PyQt - Event Handling
- PyQt - Drag & Drop Events
- PyQt - File Open Event
- PyQt - Action Event
- PyQt - Hide Event
- PyQt - Resize Event
- PyQt Database
- PyQt - Database Handling
- PyQt Essentials
- PyQt - BrushStyle Constants
- PyQt - QClipboard
- PyQt - QPixmap Class
- PyQt Useful Resources
- PyQt - Quick Guide
- PyQt - Useful Resources
- PyQt - Discussion
PyQt- Hello World
In this chapter, we will create a simplest PyQt GUI application which will display "Hello World" text in the widget window. To create this simple GUI application using PyQt we have to follow steps explained in this chapter.
Getting Started
Before we begin, ensure that you have PyQt installed in your Python environment. Once you have PyQt installed, you're all set to create your first PyQt application.
Steps to Create your first PyQt App
Step 1: Importing Necessary Modules
The first step is to import the required modules from PyQt. In our Hello, World! example, we need QApplication, QLabel, and QWidget. Also, we need to import the sys module to handle application termination and exit status. Let's import them −
import sys
from PyQt6.QtWidgets import QApplication, QLabel, QWidget
Step 2: Creating an Instance of QApplication
In this step we create an instance of QApplication. This is the foundation of any PyQt application −
app = QApplication([])
The QApplication class handles command-line arguments internally. In this example, we pass an empty list since our application won't be handling any command-line arguments.
Step 3: Creating the Application's GUI
In this step, we create a QWidget instance named window, which serves as the main window of our application.The setWindowTitle() method sets the title of the window.The setGeometry() method sets the size and position of the window on the screen.Then, we create a QLabel named helloMsg to display the "Hello, World!" message. The message is formatted using HTML to make it an h1 header. The move() method sets the position of the helloMsg label within the window.
window = QWidget()
window.setWindowTitle("PyQt App")
window.setGeometry(100, 100, 280, 80)
helloMsg = QLabel("Hello, World!
", parent=window)
helloMsg.move(60, 15)
Step 4: Displaying the GUI
After creating the GUI, we need to display it using the show() method. This schedules a paint event, requesting the GUI widgets to be painted, and adds the event to the application's event queue.
window.show()
Step 5: Running the Event Loop
Finally we can run the application's event loop using the exec() method of the QApplication instance. The exec() method starts the event loop, and sys.exit() ensures a clean exit of the application when it terminates.
sys.exit(app.exec())
Step 6: Running the PyQt Application
To run your Hello, World! application, save the above code in a file named hello.py and execute it with Python −
$ python hello.py
Output
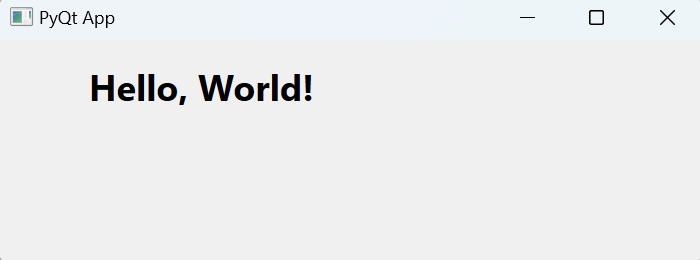
With the above steps you have written your first PyQt Application code and executed it to show the PyQt window which displays text "Hello World" message.