- PyQt - Home
- PyQt - Introduction
- PyQt - Environment
- PyQt - Hello World
- PyQt - Major Classes
- PyQt - Using Qt Designer
- PyQt - Meta Objects
- PyQt Signals & Slots
- PyQt - Signals and Slots
- PyQt - Support and Signals
- PyQt - Unbound and Bound Signals
- PyQt - New Signals with PyQtSignal
- PyQt - Connecting, Disconnecting, & Emitting Signals
- PyQt - Slot decorator
- PyQt - Slot Connection
- PyQt Layouts
- PyQt - Layout Management
- PyQt - QBoxLayout
- PyQt - QGridLayout
- PyQt - QFormLayout
- PyQt - QHBoxLayout
- PyQt - QVBoxLayout
- PyQt - QStackedLayout
- PyQt - QGraphicsGridLayout
- PyQt - QGraphicsAnchorLayout
- PyQt - QGraphicsLayout
- PyQt - QGraphicsLinearLayout
- PyQt Basic Widgets
- PyQt - Basic Widgets
- PyQt - Qlabel Widget
- PyQt - QLineEdit Widget
- PyQt - QPushButton Widget
- PyQt - QRadioButton Widget
- PyQt - QCheckBox Widget
- PyQt - QComboBox Widget
- PyQt - QSpinBox Widget
- PyQt - QMessageBox
- PyQt - QDialogButtonBox Widget
- PyQt - QFontComboBox Widget
- PyQt - QDoubleSpinBox Widget
- PyQt - QToolBox Widget
- PyQt - QMenuBar, QMenu & Qaction Widgets
- PyQt - QToolTip
- PyQt - QInputDialog Widget
- PyQt - QFontDialog Widget
- PyQt - QDialog Widget
- PyQt - QFileDialog Widget
- PyQt - QTab Widget
- PyQt - QSplitter Widget
- PyQt - QDock Widget
- PyQt - QStatusBar Widget
- PyQt - QTabBar
- PyQt - QList Widget
- PyQt - QScrollBar Widget
- PyQt - QProgressBar
- PyQt - QCalendar Widget
- PyQt - QMessageBox Widget
- PyQt - QPlainTextEdit
- PyQt - QDateEdit
- PyQt - QDateTimeEdit
- PyQt - QTimeEdit
- PyQt - QTextEdit
- PyQt - QTextBrowser
- PyQt - QScrollArea
- PyQt - Drag and Drop
- PyQt - Multiple Document Interface
- PyQt - QDialog Class
- PyQt Views
- PyQt - QColumnView
- PyQt - QTableView
- PyQt Drawing API
- PyQt - Drawing API
- PyQt - Drawing a Line
- PyQt - Drawing a Rectangle
- PyQt - Drawing a Triangle
- PyQt - Drawing a Circle
- PyQt - Drawing a Ellipse
- PyQt - Drawing a Polygon
- PyQt - Geometric Transformation
- PyQt - Drawing Effect
- PyQt Groups
- PyQt - QButtonGroup
- PyQt - QGroupBox
- PyQt Effects
- PyQt - Effects
- PyQt - Opacity Effect
- PyQt - QGraphicsBlur Effect
- PyQt - QGraphicsColorize Effect
- PyQt - QGraphicsDropShadow Effect
- PyQt Events
- PyQt - Event Handling
- PyQt - Drag & Drop Events
- PyQt - File Open Event
- PyQt - Action Event
- PyQt - Hide Event
- PyQt - Resize Event
- PyQt Database
- PyQt - Database Handling
- PyQt Essentials
- PyQt - BrushStyle Constants
- PyQt - QClipboard
- PyQt - QPixmap Class
- PyQt Useful Resources
- PyQt - Quick Guide
- PyQt - Useful Resources
- PyQt - Discussion
PyQt - QVBoxLayout
The QVBoxLayout is a class that constructs the layout container vertically. The container is sequentially arranged from top to bottom. The vertical series of container can be created using various PyQt functions- setLayout(), QPushButton(), addWidgets(), addStretch(), setStyleSheet(), etc. Therefore, all these function object create an active layout manager.
Syntax of QVBoxLayout
Building a vertical set of container layout uses the following syntax −
QVBoxLayout()
Usage of QVBoxLayout in PyQt Window
- Vertical Arrangement − QVBoxLayout is a layout manager which responsible to arrange the widget in vertical order.
- Dynamic Resizing − It is dynamically resize beacuse main window is resized.
- Easy Widget addition − We can add widgets using addWidget() method.
- Spacing management − The space of QVBoxLayout can be maintained through the addStretch() method. This method is used when there is a need for space.
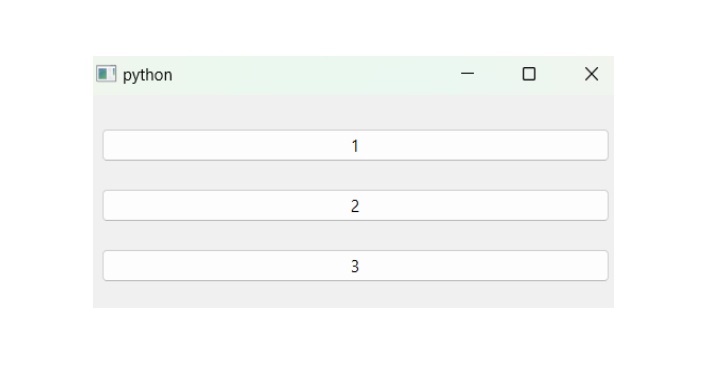
Example 1
Here, we create a QVBoxLayout that use the method addWidget() and display the buttons in vertical direction.
from PyQt6.QtWidgets import QApplication, QWidget, QPushButton, QVBoxLayout
app = QApplication([])
window = QWidget()
layout = QVBoxLayout()
layout.addWidget(QPushButton('1'))
layout.addWidget(QPushButton('2'))
layout.addWidget(QPushButton('3'))
window.setLayout(layout)
window.show()
app.exec()
Output
On executing the code, we get the following output −
Example 2
Below the example illustrates the color filled vertical buttons using QVBoxLayout. The container can filled using QColor class which provide built-in function Color() to set the name of the color.
import sys
from PyQt6.QtWidgets import QApplication, QMainWindow, QVBoxLayout, QWidget
from PyQt6.QtGui import QColor
class Color(QWidget):
   def __init__(self, color):
      super().__init__()
      self.setAutoFillBackground(True)
      # default palette for current style
      palette = self.palette()
      # Modify the color
      palette.setColor(self.backgroundRole(), QColor(color))
      self.setPalette(palette)

class MainWindow(QMainWindow):
   def __init__(self):
      super(MainWindow, self).__init__()
      # Setting window title
      self.setWindowTitle("My App")

      layout = QVBoxLayout()
      layout.addWidget(Color('orange'))
      layout.addWidget(Color('blue'))
      layout.addWidget(Color('green'))

      widget = QWidget()
      widget.setLayout(layout)
      self.setCentralWidget(widget)

if __name__ == "__main__":
   app = QApplication(sys.argv)
   window = MainWindow()
   window.show()
   sys.exit(app.exec())
Output
On executing the code, we get three widgets container in different colors −

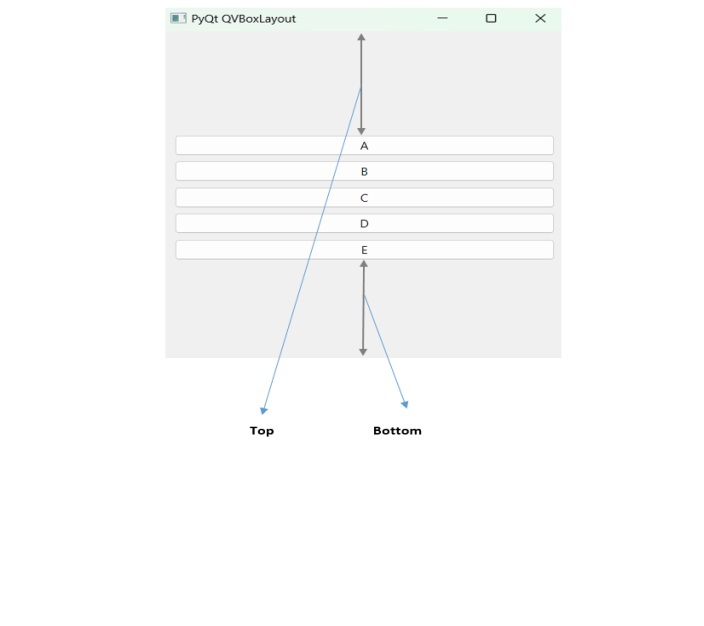
Example 3
We add the method addStretch() that align the buttons in the center. Here, we use use vertical spacer from beginning to widget(top) and then widget to end(bottom).
import sys
from PyQt6.QtWidgets import QApplication, QWidget, QPushButton, QVBoxLayout
class MainWindow(QWidget):
   def __init__(self, *args, **kwargs):
      super().__init__(*args, **kwargs)
      self.setWindowTitle('PyQt QVBoxLayout')
      # create a layout
      layout = QVBoxLayout()
      self.setLayout(layout)
      # add a spacer
      layout.addStretch()
      # create buttons and add them to the layout
      title = ['A', 'B', 'C', 'D', 'E']
      buttons = [QPushButton(t) for t in title]
      for button in buttons:
         layout.addWidget(button)
      # add a spacer
      layout.addStretch()
      # show the window
      self.show()

if __name__ == '__main__':
   app = QApplication(sys.argv)
   window = MainWindow()
   sys.exit(app.exec())
Output
On executing the code, we get the following result −