- PyQt - Home
- PyQt - Introduction
- PyQt - Environment
- PyQt - Hello World
- PyQt - Major Classes
- PyQt - Using Qt Designer
- PyQt - Meta Objects
- PyQt Signals & Slots
- PyQt - Signals and Slots
- PyQt - Support and Signals
- PyQt - Unbound and Bound Signals
- PyQt - New Signals with PyQtSignal
- PyQt - Connecting, Disconnecting, & Emitting Signals
- PyQt - Slot decorator
- PyQt - Slot Connection
- PyQt Layouts
- PyQt - Layout Management
- PyQt - QBoxLayout
- PyQt - QGridLayout
- PyQt - QFormLayout
- PyQt - QHBoxLayout
- PyQt - QVBoxLayout
- PyQt - QStackedLayout
- PyQt - QGraphicsGridLayout
- PyQt - QGraphicsAnchorLayout
- PyQt - QGraphicsLayout
- PyQt - QGraphicsLinearLayout
- PyQt Basic Widgets
- PyQt - Basic Widgets
- PyQt - Qlabel Widget
- PyQt - QLineEdit Widget
- PyQt - QPushButton Widget
- PyQt - QRadioButton Widget
- PyQt - QCheckBox Widget
- PyQt - QComboBox Widget
- PyQt - QSpinBox Widget
- PyQt - QMessageBox
- PyQt - QDialogButtonBox Widget
- PyQt - QFontComboBox Widget
- PyQt - QDoubleSpinBox Widget
- PyQt - QToolBox Widget
- PyQt - QMenuBar, QMenu & Qaction Widgets
- PyQt - QToolTip
- PyQt - QInputDialog Widget
- PyQt - QFontDialog Widget
- PyQt - QDialog Widget
- PyQt - QFileDialog Widget
- PyQt - QTab Widget
- PyQt - QSplitter Widget
- PyQt - QDock Widget
- PyQt - QStatusBar Widget
- PyQt - QTabBar
- PyQt - QList Widget
- PyQt - QScrollBar Widget
- PyQt - QProgressBar
- PyQt - QCalendar Widget
- PyQt - QMessageBox Widget
- PyQt - QPlainTextEdit
- PyQt - QDateEdit
- PyQt - QDateTimeEdit
- PyQt - QTimeEdit
- PyQt - QTextEdit
- PyQt - QTextBrowser
- PyQt - QScrollArea
- PyQt - Drag and Drop
- PyQt - Multiple Document Interface
- PyQt - QDialog Class
- PyQt Views
- PyQt - QColumnView
- PyQt - QTableView
- PyQt Drawing API
- PyQt - Drawing API
- PyQt - Drawing a Line
- PyQt - Drawing a Rectangle
- PyQt - Drawing a Triangle
- PyQt - Drawing a Circle
- PyQt - Drawing a Ellipse
- PyQt - Drawing a Polygon
- PyQt - Geometric Transformation
- PyQt - Drawing Effect
- PyQt Groups
- PyQt - QButtonGroup
- PyQt - QGroupBox
- PyQt Effects
- PyQt - Effects
- PyQt - Opacity Effect
- PyQt - QGraphicsBlur Effect
- PyQt - QGraphicsColorize Effect
- PyQt - QGraphicsDropShadow Effect
- PyQt Events
- PyQt - Event Handling
- PyQt - Drag & Drop Events
- PyQt - File Open Event
- PyQt - Action Event
- PyQt - Hide Event
- PyQt - Resize Event
- PyQt Database
- PyQt - Database Handling
- PyQt Essentials
- PyQt - BrushStyle Constants
- PyQt - QClipboard
- PyQt - QPixmap Class
- PyQt Useful Resources
- PyQt - Quick Guide
- PyQt - Useful Resources
- PyQt - Discussion
PyQt - Geometric Transformation
The Geometric transformation refers to understanding the dynamic aspect of a geometrical figure. The geometric figure is used to describe the architectural behavior i.e. used in a wide range of applications such as resizing, positioning, image processing, etc.
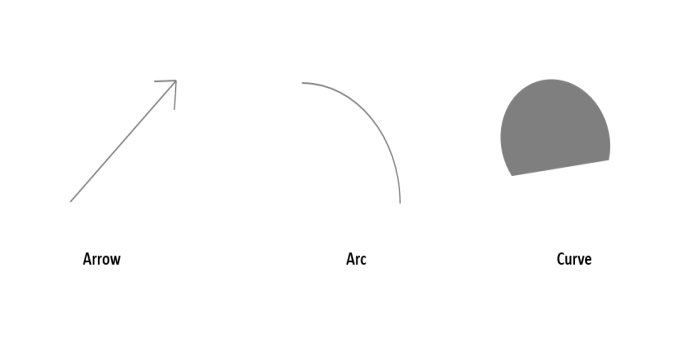
Mostly three types of painting are used in geometric transformation − arrow, arc, and curve. All these figures are mathematically implemented in the graph.
The classes QPainter and QPainterPath operate the task of painting operation which can be reused and construted for graphical shape.
Drawing an arrow in PyQt
An arrow is a direct line segement which indicate the direction. To draw an arc, use the drawLine() method for three times- one will be horizontal line and rest two are head and down of an arrow.
Example
Following example to illustrate an arrow using PyQt.
from PyQt6 import QtWidgets, QtGui, QtCore
class MyWidget(QtWidgets.QWidget):
   def paintEvent(self, event):
      painter = QtGui.QPainter(self)
      painter.setRenderHint(QtGui.QPainter.RenderHint.Antialiasing)
      painter.setPen(QtGui.QColor(QtCore.Qt.GlobalColor.green))
      painter.setBrush(QtGui.QColor(QtCore.Qt.GlobalColor.white))

      # Draw lines
      # Straight line
      painter.drawLine(600, 100, 100, 100)
      # Head line
      painter.drawLine(250, 150, 100, 100)
      # Down line
      painter.drawLine(250, 50, 100, 100)

app = QtWidgets.QApplication([])
widget = MyWidget()
widget.show()
app.exec()
Output
The above code produces the following output −
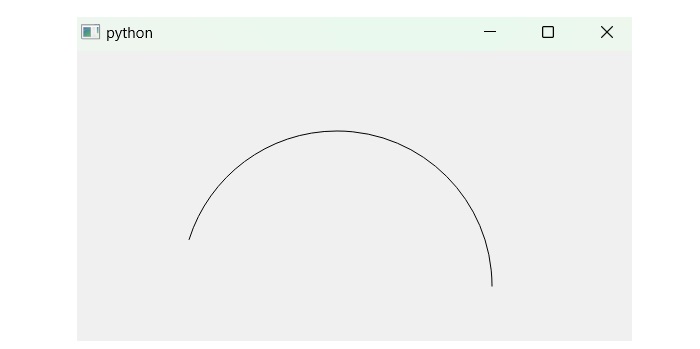
Drawing an arc in PyQt
The arc is defined by the circumference of a circle. The method drawArc() is used to build an arc. In addition, the method setPen() and setBrush() are set for coloring the graph.
Syntax
Following syntax to draw an arc using PyQt −
drawArc(x_axis, y_axis, width, length, startAngle, spanAngle)
Parameters
- x_axis and y-axis − The axes represent the upper-left corner of the rectangle that bound the ellipse from which the arc has been drawn.
- width and height − This determines the size of an arc.
- startAngle − It is an angle that is measured clockwise from the x-axis to the starting point of an arc.
- spanAngle − This angle is measured in degree and clockwise from the startAngle parameter to the ending point of an arc.
Example
Following example to illustrate an arc using PyQt.
from PyQt6 import QtWidgets, QtGui, QtCore
from PyQt6.QtGui import QPainter
class MyWidget(QtWidgets.QWidget):
   def paintEvent(self, event):
      painter = QPainter(self)
      painter.setRenderHint(QtGui.QPainter.RenderHint.Antialiasing)
      painter.setPen(QtGui.QColor(QtCore.Qt.GlobalColor.black))
      painter.setBrush(QtGui.QColor(QtCore.Qt.GlobalColor.white))
      painter.drawArc(110, 80, 310, 310, 0 * 26, 100 * 26)

app = QtWidgets.QApplication([])
widget = MyWidget()
widget.show()
app.exec()
Output
The above code produces the following output −
Drawing a curve in PyQt
A line that is not straight is called a curve. Here, QPainterPath class is called using the function drawPath() because the variable path is associated with the function cubicTo() to calculate the curve using its parameters.
Syntax
Following the main syntax used to calculate the points of curve using PyQt −
cubicTo(control_point_x1, control_point_y1, control_point_x2, control_point_y2,
end_point_x, end_point_y)
Example
Following example illustrate the code snippet of curve using PyQt.
from PyQt6 import QtWidgets, QtGui, QtCore
from PyQt6.QtGui import QPainter, QPainterPath
class MyWidget(QtWidgets.QWidget):
   def paintEvent(self, event):
      painter = QPainter()
      path = QPainterPath()
      painter.begin(self)
      painter.setRenderHint(QtGui.QPainter.RenderHint.Antialiasing)
      painter.setPen(QtGui.QColor(QtCore.Qt.GlobalColor.gray))
      painter.setBrush(QtGui.QColor(QtCore.Qt.GlobalColor.gray))
      # start point
      path.moveTo(40, 40)
      # points calculation using cubicTo() method
      path.cubicTo(40, 40, 150, 250, 250, 40)
      painter.drawPath(path)
      painter.end()

app = QtWidgets.QApplication([])
widget = MyWidget()
widget.show()
app.exec()
Output
The above code produces the following output −
