- PyQt - Home
- PyQt - Introduction
- PyQt - Environment
- PyQt - Hello World
- PyQt - Major Classes
- PyQt - Using Qt Designer
- PyQt - Meta Objects
- PyQt Signals & Slots
- PyQt - Signals and Slots
- PyQt - Support and Signals
- PyQt - Unbound and Bound Signals
- PyQt - New Signals with PyQtSignal
- PyQt - Connecting, Disconnecting, & Emitting Signals
- PyQt - Slot decorator
- PyQt - Slot Connection
- PyQt Layouts
- PyQt - Layout Management
- PyQt - QBoxLayout
- PyQt - QGridLayout
- PyQt - QFormLayout
- PyQt - QHBoxLayout
- PyQt - QVBoxLayout
- PyQt - QStackedLayout
- PyQt - QGraphicsGridLayout
- PyQt - QGraphicsAnchorLayout
- PyQt - QGraphicsLayout
- PyQt - QGraphicsLinearLayout
- PyQt Basic Widgets
- PyQt - Basic Widgets
- PyQt - Qlabel Widget
- PyQt - QLineEdit Widget
- PyQt - QPushButton Widget
- PyQt - QRadioButton Widget
- PyQt - QCheckBox Widget
- PyQt - QComboBox Widget
- PyQt - QSpinBox Widget
- PyQt - QMessageBox
- PyQt - QDialogButtonBox Widget
- PyQt - QFontComboBox Widget
- PyQt - QDoubleSpinBox Widget
- PyQt - QToolBox Widget
- PyQt - QMenuBar, QMenu & Qaction Widgets
- PyQt - QToolTip
- PyQt - QInputDialog Widget
- PyQt - QFontDialog Widget
- PyQt - QDialog Widget
- PyQt - QFileDialog Widget
- PyQt - QTab Widget
- PyQt - QSplitter Widget
- PyQt - QDock Widget
- PyQt - QStatusBar Widget
- PyQt - QTabBar
- PyQt - QList Widget
- PyQt - QScrollBar Widget
- PyQt - QProgressBar
- PyQt - QCalendar Widget
- PyQt - QMessageBox Widget
- PyQt - QPlainTextEdit
- PyQt - QDateEdit
- PyQt - QDateTimeEdit
- PyQt - QTimeEdit
- PyQt - QTextEdit
- PyQt - QTextBrowser
- PyQt - QScrollArea
- PyQt - Drag and Drop
- PyQt - Multiple Document Interface
- PyQt - QDialog Class
- PyQt Views
- PyQt - QColumnView
- PyQt - QTableView
- PyQt Drawing API
- PyQt - Drawing API
- PyQt - Drawing a Line
- PyQt - Drawing a Rectangle
- PyQt - Drawing a Triangle
- PyQt - Drawing a Circle
- PyQt - Drawing a Ellipse
- PyQt - Drawing a Polygon
- PyQt - Geometric Transformation
- PyQt - Drawing Effect
- PyQt Groups
- PyQt - QButtonGroup
- PyQt - QGroupBox
- PyQt Effects
- PyQt - Effects
- PyQt - Opacity Effect
- PyQt - QGraphicsBlur Effect
- PyQt - QGraphicsColorize Effect
- PyQt - QGraphicsDropShadow Effect
- PyQt Events
- PyQt - Event Handling
- PyQt - Drag & Drop Events
- PyQt - File Open Event
- PyQt - Action Event
- PyQt - Hide Event
- PyQt - Resize Event
- PyQt Database
- PyQt - Database Handling
- PyQt Essentials
- PyQt - BrushStyle Constants
- PyQt - QClipboard
- PyQt - QPixmap Class
- PyQt Useful Resources
- PyQt - Quick Guide
- PyQt - Useful Resources
- PyQt - Discussion
PyQt - QSplitter Widget
In GUI development, a splitter allows resizable panel divisions, enhancing layout flexibility and user interaction within application. The panel define the division of one or more section. We can consider the scenario where multiple windows of an application are open and visible on the screen.
This is another advanced layout manager which allows the size of child widgets to be changed dynamically by dragging the boundaries between them. The Splitter control provides a handle that can be dragged to resize the controls.
The widgets in a QSplitter object are laid horizontally by default although the orientation can be changed to Qt.Vertical.
Following are the methods and signals of QSplitter class −
| Sr.No. | Methods & Description |
|---|---|
| 1 |
addWidget() Adds the widget to splitters layout |
| 2 |
indexOf() Returns the index of the widget in the layout |
| 3 |
insetWidget() Inserts a widget at the specified index |
| 4 |
setOrientation() Sets the layout of splitter to Qt.Horizontal or Qt.Vertical |
| 5 |
setSizes() Sets the initial size of each widget |
| 6 |
count() Returns the number of widgets in splitter widget |
splitterMoved() is the only signal emitted by QSplitter object whenever the splitter handle is dragged.
Example
The following example has a splitter object, splitter1, in which a frame and QTextEdit object are horizontally added.
topleft = QFrame()
topleft.setFrameShape(QFrame.Shape.StyledPanel)
textedit = QTextEdit()
splitter1.addWidget(topleft)
splitter1.addWidget(textedit)
This splitter object splitter1 and a bottom frame object are added in another splitter, splitter2, vertically. The object splitters is finally added in the top level window.
bottom = QFrame()
splitter2 = QSplitter(Qt.Orientation.Vertical)
splitter2.addWidget(splitter1)
splitter2.addWidget(bottom)

hbox.addWidget(splitter2)
self.setLayout(hbox)
The complete code is as follows −
import sys
from PyQt6.QtCore import Qt
from PyQt6.QtWidgets import ( QApplication, QMainWindow, QTextEdit,
QFrame, QSplitter, QHBoxLayout, QVBoxLayout, QWidget)
class Example(QMainWindow):
   def __init__(self):
      super().__init__()
      self.initUI()

   def initUI(self):
      # Create top-left and bottom frames with styled panel appearance
      topleft = QFrame()
      topleft.setFrameShape(QFrame.Shape.StyledPanel)
      bottom = QFrame()
      bottom.setFrameShape(QFrame.Shape.StyledPanel)

      # Create a text edit widget
      textedit = QTextEdit()

      # Create horizontal splitter to divide top area
      splitter1 = QSplitter(Qt.Orientation.Horizontal)
      splitter1.addWidget(topleft)
      splitter1.addWidget(textedit)
      # Set initial widget sizes
      splitter1.setSizes([100, 200])

      # Create vertical splitter to divide left and bottom areas
      splitter2 = QSplitter(Qt.Orientation.Vertical)
      splitter2.addWidget(splitter1)
      splitter2.addWidget(bottom)

      # Create a central widget and layout to hold the splitters
      central_widget = QWidget()
      hbox = QHBoxLayout(central_widget)
      hbox.addWidget(splitter2)
      self.setCentralWidget(central_widget)

      # Apply cleanlooks style for visual consistency
      QApplication.setStyle("cleanlooks")

      self.setGeometry(300, 300, 300, 200)
      self.setWindowTitle("QSplitter")
      self.show()

if __name__ == "__main__":
   app = QApplication(sys.argv)
   ex = Example()
   sys.exit(app.exec())
The above code produces the following output −
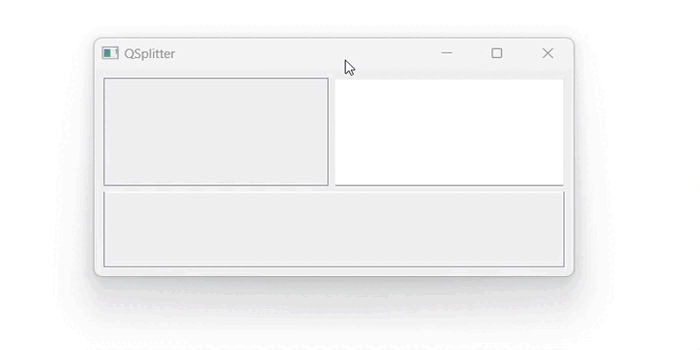
Below the screenshot help us to understand the visualization of QSplitter widgets −
