- PyQt - Home
- PyQt - Introduction
- PyQt - Environment
- PyQt - Hello World
- PyQt - Major Classes
- PyQt - Using Qt Designer
- PyQt - Meta Objects
- PyQt Signals & Slots
- PyQt - Signals and Slots
- PyQt - Support and Signals
- PyQt - Unbound and Bound Signals
- PyQt - New Signals with PyQtSignal
- PyQt - Connecting, Disconnecting, & Emitting Signals
- PyQt - Slot decorator
- PyQt - Slot Connection
- PyQt Layouts
- PyQt - Layout Management
- PyQt - QBoxLayout
- PyQt - QGridLayout
- PyQt - QFormLayout
- PyQt - QHBoxLayout
- PyQt - QVBoxLayout
- PyQt - QStackedLayout
- PyQt - QGraphicsGridLayout
- PyQt - QGraphicsAnchorLayout
- PyQt - QGraphicsLayout
- PyQt - QGraphicsLinearLayout
- PyQt Basic Widgets
- PyQt - Basic Widgets
- PyQt - Qlabel Widget
- PyQt - QLineEdit Widget
- PyQt - QPushButton Widget
- PyQt - QRadioButton Widget
- PyQt - QCheckBox Widget
- PyQt - QComboBox Widget
- PyQt - QSpinBox Widget
- PyQt - QMessageBox
- PyQt - QDialogButtonBox Widget
- PyQt - QFontComboBox Widget
- PyQt - QDoubleSpinBox Widget
- PyQt - QToolBox Widget
- PyQt - QMenuBar, QMenu & Qaction Widgets
- PyQt - QToolTip
- PyQt - QInputDialog Widget
- PyQt - QFontDialog Widget
- PyQt - QDialog Widget
- PyQt - QFileDialog Widget
- PyQt - QTab Widget
- PyQt - QSplitter Widget
- PyQt - QDock Widget
- PyQt - QStatusBar Widget
- PyQt - QTabBar
- PyQt - QList Widget
- PyQt - QScrollBar Widget
- PyQt - QProgressBar
- PyQt - QCalendar Widget
- PyQt - QMessageBox Widget
- PyQt - QPlainTextEdit
- PyQt - QDateEdit
- PyQt - QDateTimeEdit
- PyQt - QTimeEdit
- PyQt - QTextEdit
- PyQt - QTextBrowser
- PyQt - QScrollArea
- PyQt - Drag and Drop
- PyQt - Multiple Document Interface
- PyQt - QDialog Class
- PyQt Views
- PyQt - QColumnView
- PyQt - QTableView
- PyQt Drawing API
- PyQt - Drawing API
- PyQt - Drawing a Line
- PyQt - Drawing a Rectangle
- PyQt - Drawing a Triangle
- PyQt - Drawing a Circle
- PyQt - Drawing a Ellipse
- PyQt - Drawing a Polygon
- PyQt - Geometric Transformation
- PyQt - Drawing Effect
- PyQt Groups
- PyQt - QButtonGroup
- PyQt - QGroupBox
- PyQt Effects
- PyQt - Effects
- PyQt - Opacity Effect
- PyQt - QGraphicsBlur Effect
- PyQt - QGraphicsColorize Effect
- PyQt - QGraphicsDropShadow Effect
- PyQt Events
- PyQt - Event Handling
- PyQt - Drag & Drop Events
- PyQt - File Open Event
- PyQt - Action Event
- PyQt - Hide Event
- PyQt - Resize Event
- PyQt Database
- PyQt - Database Handling
- PyQt Essentials
- PyQt - BrushStyle Constants
- PyQt - QClipboard
- PyQt - QPixmap Class
- PyQt Useful Resources
- PyQt - Quick Guide
- PyQt - Useful Resources
- PyQt - Discussion
PyQt - QGridLayout Class
A GridLayout class object presents with a grid of cells arranged in rows and columns. The class contains addWidget() method. Any widget can be added by specifying the number of rows and columns of the cell. Optionally, a spanning factor for row as well as column, if specified makes the widget wider or taller than one cell.
Two overloads of addWidget() method are as follows −
| Sr.No. | Methods & Description |
|---|---|
| 1 |
addWidget(QWidget, int r, int c) Adds a widget at specified row and column |
| 2 |
addWidget(QWidget, int r, int c, int rowspan, int columnspan) Adds a widget at specified row and column and having specified width and/or height |
A child layout object can also be added at any cell in the grid.
| Sr.No. | Methods & Description |
|---|---|
| 1 |
addLayout(QLayout, int r, int c) Adds a layout object at specified row and column |
Columns methods in QGridLayout
The QGridLayout contains two column methods −
- setColumnMinimumWidth() − Set the minimum width of the container.
- setColumnStretch() − Set the amount of additional space for a column that will get beyond its necessary.
Grid Layout using nested loop and setGeometry() method
The Grid Layout is constructed using the setGeometry() method and this method refers to the size and location of the pushbutton. So we have nested for loop and addWidget() method to perform this task.
Example
In the following example, we create a grid layout of 16 push buttons that are arranged in 4 rows and columns.
import sys
from PyQt6.QtWidgets import QApplication, QWidget, QGridLayout, QPushButton
def window():
   app = QApplication(sys.argv)
   win = QWidget()
   grid = QGridLayout()

   for i in range(1, 5):
      for j in range(1, 5):
         grid.addWidget(QPushButton("B" + str(i) + str(j)), i, j)

   win.setLayout(grid)
   win.setGeometry(100, 100, 200, 100)
   win.setWindowTitle("PyQt")
   win.show()
   sys.exit(app.exec())

if __name__ == '__main__':
   window()
Output
The above code produces the following output −
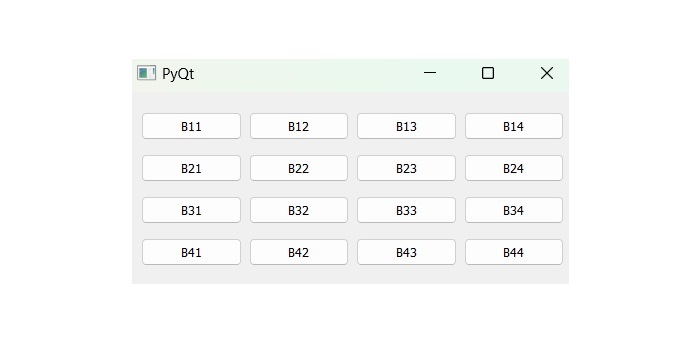
The code uses two nested for loops for row and column numbers, denoted by variables i and j. They are converted to string to concatenate the caption of each push button to be added at ith row and jth column.
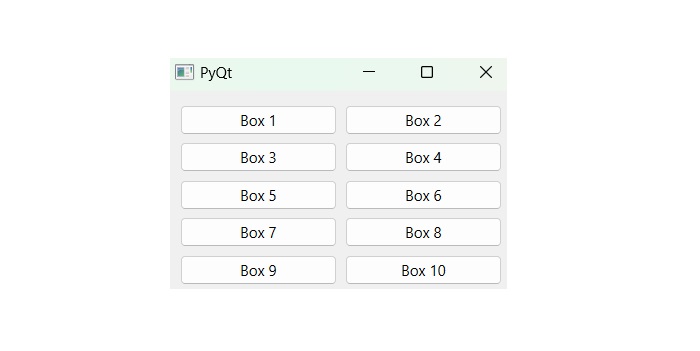
Two Column Layout using QGridLayout
The two column layout uses the columns having equal-height, equal-width, and side-by-side visibility on computer or mobile screens. In PyQt, we develop the group of boxes into two separate column which can be built through various built-in function of QGridLayout class- QGridLayout(), QPushButton(), setLayout(), and setLayout().
Example
Following example demonstrate the code of two-columns layout using QGridlayout.
from PyQt6.QtWidgets import QApplication, QWidget, QGridLayout, QPushButton
class TwoColumnLayout(QWidget):
   def __init__(self):
      super().__init__()

      # Create a QGridLayout instance
      layout = QGridLayout()
      # Add widgets to the layout
      for i in range(10):
         layout.addWidget(QPushButton(f'Box {i+1}'), i // 2, i % 2)
      # Set the layout on the application's window
      self.setLayout(layout)

app = QApplication([])
window = TwoColumnLayout()
window.setWindowTitle('PyQt')
window.show()
app.exec()
Output
The above code produces the following output −