- Computer Graphics - Home
- Computer Graphics Basics
- Computer Graphics Applications
- Graphics APIs and Pipelines
- Computer Graphics Maths
- Sets and Mapping
- Solving Quadratic Equations
- Computer Graphics Trigonometry
- Computer Graphics Vectors
- Linear Interpolation
- Computer Graphics Devices
- Cathode Ray Tube
- Raster Scan Display
- Random Scan Device
- Phosphorescence Color CRT
- Flat Panel Displays
- 3D Viewing Devices
- Images Pixels and Geometry
- Color Models
- Line Generation
- Line Generation Algorithm
- DDA Algorithm
- Bresenham's Line Generation Algorithm
- Mid-point Line Generation Algorithm
- Circle Generation
- Circle Generation Algorithm
- Bresenham's Circle Generation Algorithm
- Mid-point Circle Generation Algorithm
- Ellipse Generation Algorithm
- Polygon Filling
- Polygon Filling Algorithm
- Scan Line Algorithm
- Flood Filling Algorithm
- Boundary Fill Algorithm
- 4 and 8 Connected Polygon
- Inside Outside Test
- 2D Transformation
- 2D Transformation
- Transformation Between Coordinate System
- Affine Transformation
- Raster Methods Transformation
- 2D Viewing
- Viewing Pipeline and Reference Frame
- Window Viewport Coordinate Transformation
- Viewing & Clipping
- Point Clipping Algorithm
- Cohen-Sutherland Line Clipping
- Cyrus-Beck Line Clipping Algorithm
- Polygon Clipping Sutherland–Hodgman Algorithm
- Text Clipping
- Clipping Techniques
- Bitmap Graphics
- 3D Viewing Transformation
- 3D Computer Graphics
- Parallel Projection
- Orthographic Projection
- Oblique Projection
- Perspective Projection
- 3D Transformation
- Rotation with Quaternions
- Modelling and Coordinate Systems
- Back-face Culling
- Lighting in 3D Graphics
- Shadowing in 3D Graphics
- 3D Object Representation
- Represnting Polygons
- Computer Graphics Surfaces
- Visible Surface Detection
- 3D Objects Representation
- Computer Graphics Curves
- Computer Graphics Curves
- Types of Curves
- Bezier Curves and Surfaces
- B-Spline Curves and Surfaces
- Data Structures For Graphics
- Triangle Meshes
- Scene Graphs
- Spatial Data Structure
- Binary Space Partitioning
- Tiling Multidimensional Arrays
- Color Theory
- Colorimetry
- Chromatic Adaptation
- Color Appearance
- Antialiasing
- Ray Tracing
- Ray Tracing Algorithm
- Perspective Ray Tracing
- Computing Viewing Rays
- Ray-Object Intersection
- Shading in Ray Tracing
- Transparency and Refraction
- Constructive Solid Geometry
- Texture Mapping
- Texture Values
- Texture Coordinate Function
- Antialiasing Texture Lookups
- Procedural 3D Textures
- Reflection Models
- Real-World Materials
- Implementing Reflection Models
- Specular Reflection Models
- Smooth-Layered Model
- Rough-Layered Model
- Surface Shading
- Diffuse Shading
- Phong Shading
- Artistic Shading
- Computer Animation
- Computer Animation
- Keyframe Animation
- Morphing Animation
- Motion Path Animation
- Deformation Animation
- Character Animation
- Physics-Based Animation
- Procedural Animation Techniques
- Computer Graphics Fractals
Artistic Shading in Computer Graphics
Diffuse Shading and Phong Shading are designed to mimic the real-world behavior of light. In contrast, Artistic Shading focuses on creating images that look like they were drawn by an artist. This type of shading can be useful for many applications, such as technical drawings or stylized renderings.
In this chapter, we will explain the concept of artistic shading, how it differs from other shading methods, and also see examples of how it can be applied.
What is Artistic Shading?
Artistic Shading does not actually attempt to perfectly simulate how light interacts with objects in the real world. Instead, it tries to replicate the techniques used by artists in hand-drawn illustrations. These techniques often result in images that are simpler, but still very effective at communicating the shape, texture, and detail of objects.
Artistic Shading has several advantages. For example, a car manufacturers often hire artists to create illustrations for user manuals instead of using photographs. This is because these illustrations can focus on the most important details, making them easier for people to understand. The artistic shading is useful for creating these kinds of simplified but expressive images. This technique is often referred to as non-photorealistic rendering.
Line Drawing
One of the most common techniques used in artistic shading is line drawing. This technique is used to draw line on edges and silhouettes to define the shape of an object.
In human drawings, we often see sharp edges that highlight the shape of the object. These edges and lines are not always present in real life, but they help emphasize important details in the drawing.
In computer graphics, we can create a similar effect by drawing the silhouettes of objects. A silhouette is drawn when the edges of an object face the viewer. Specifically, if one side of an edge is facing toward the viewer and the other side is facing away, then the edge is considered a silhouette. The outline design is given in the above figure.
The condition to draw a silhouette is −
$$\mathrm{\text{draw silhouette if } (e \: \cdot\: n_0)(e\: \cdot\: n_1)\: \leq \:0}$$
Here, e is a vector pointing from the edge to the eye, and n0 and n1 are the normals of the triangles sharing the edge. This test checks if the edge is facing the viewer or not. This determines whether a silhouette should be drawn or not.
In addition to silhouettes, we might want to draw the visible edges of a polygonal model. We can use hidden surface methods to first draw the object's background and then draw the outlines in black. This captures both silhouettes and visible edges.
However, sometimes the polygons represent a smooth surface, and drawing all the edges may not be desirable. Instead, we can focus on drawing creases—places where there is a sharp corner or a significant angle between adjacent triangles.
The condition to draw a crease is −
$$\mathrm{\text{draw crease if } (n_0 \:\cdot\: n_1)\: \leq \:\text{threshold}}$$
By setting a threshold for how sharp the angle needs to be, we can control which edges will appear as creases.
For example, think of a drawing of a cube. The cube has sharp edges where each face meets another. Line drawing can capture these edges and create a simple but effective representation of the cube. Similarly, if the object is a smooth sphere, the shading might leave out many of the internal edges but focus on its silhouette.
Cool-to-Warm Shading
Another common technique in artistic shading is cool-to-warm shading. Artists often use different colors to indicate which parts of an object face the light and which parts face away.
Surfaces facing toward the light are shaded with warm colors (such as reds or oranges), while surfaces facing away from the light are shaded with cool colors (such as blues or purples). This type of shading gives a sense of form and curvature to the surface.
In computer graphics, we can simulate this effect by setting up a warm light direction and using the cosine of the angle between the surface normal and the light direction to modulate the color. The warmth constant (kw) is defined as −
$$\mathrm{kw \:=\: \frac{1 \:+\: n\: \cdot\: l}{2}}$$
Here, n is the surface normal, and l is the light direction. The resulting color c is a blend of a cool color (cc) and a warm color (cw) −
$$\mathrm{c \:=\: kw \:\cdot\: cw \:+\: (1 \:-\: kw)\: \cdot\: cc}$$
By adjusting the warm and cool colors, artists can create a variety of effects. A good starting point for these colors might be:
- Cool color: cc = (0.4, 0.4, 0.7) (a soft blue tone)
- Warm color: cw = (0.8, 0.6, 0.6) (a soft orange tone)
This shading technique can give a cartoon-like effect by emphasizing the curves and shape of the object without making it too dark or realistic. The warm and cool colors are generally unsaturated, which allows the black outlines to stand out.
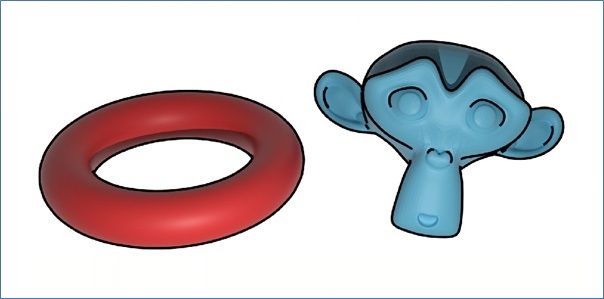
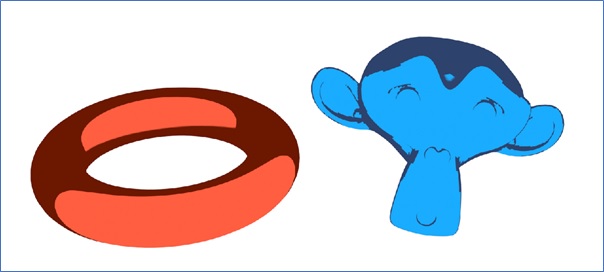
See the following example of torus and monkey but with toon shader.
Combining Artistic Shading Techniques
Artistic shading can combining different techniques to achieve the desired look. By mixing line drawing with cool-to-warm shading, we can create a striking visual style. The outlines provide a clear shape, while the shading gives the surface a sense of depth.
Another option is to use simplified shading models along with artistic shading. For example, we can apply Lambertian shading to simulate diffuse surfaces but enhance it with lines and cool-to-warm colors to create an artistic effect.
Consider a technical drawing of a car. The illustration could use line drawing to highlight the edges of the car’s body, with cool-to-warm shading to add depth to the surfaces. The result would be a clear and informative image, similar to what you might see in a car owner's manual.
Conclusion
In this chapter, we explained the concept of artistic shading in computer graphics and how it differs from traditional shading techniques. We started by discussing the purpose of artistic shading, which is to create images that look more like drawings rather than real-world simulations.
We then looked at line drawing. This is a method that uses edges and silhouettes to define shapes. Next, we examined cool-to-warm shading, which adds color to surfaces based on the direction of light. Finally, we discussed how these techniques can be combined to create expressive, easy to understand images.