- Computer Graphics - Home
- Computer Graphics Basics
- Computer Graphics Applications
- Graphics APIs and Pipelines
- Computer Graphics Maths
- Sets and Mapping
- Solving Quadratic Equations
- Computer Graphics Trigonometry
- Computer Graphics Vectors
- Linear Interpolation
- Computer Graphics Devices
- Cathode Ray Tube
- Raster Scan Display
- Random Scan Device
- Phosphorescence Color CRT
- Flat Panel Displays
- 3D Viewing Devices
- Images Pixels and Geometry
- Color Models
- Line Generation
- Line Generation Algorithm
- DDA Algorithm
- Bresenham's Line Generation Algorithm
- Mid-point Line Generation Algorithm
- Circle Generation
- Circle Generation Algorithm
- Bresenham's Circle Generation Algorithm
- Mid-point Circle Generation Algorithm
- Ellipse Generation Algorithm
- Polygon Filling
- Polygon Filling Algorithm
- Scan Line Algorithm
- Flood Filling Algorithm
- Boundary Fill Algorithm
- 4 and 8 Connected Polygon
- Inside Outside Test
- 2D Transformation
- 2D Transformation
- Transformation Between Coordinate System
- Affine Transformation
- Raster Methods Transformation
- 2D Viewing
- Viewing Pipeline and Reference Frame
- Window Viewport Coordinate Transformation
- Viewing & Clipping
- Point Clipping Algorithm
- Cohen-Sutherland Line Clipping
- Cyrus-Beck Line Clipping Algorithm
- Polygon Clipping Sutherland–Hodgman Algorithm
- Text Clipping
- Clipping Techniques
- Bitmap Graphics
- 3D Viewing Transformation
- 3D Computer Graphics
- Parallel Projection
- Orthographic Projection
- Oblique Projection
- Perspective Projection
- 3D Transformation
- Rotation with Quaternions
- Modelling and Coordinate Systems
- Back-face Culling
- Lighting in 3D Graphics
- Shadowing in 3D Graphics
- 3D Object Representation
- Represnting Polygons
- Computer Graphics Surfaces
- Visible Surface Detection
- 3D Objects Representation
- Computer Graphics Curves
- Computer Graphics Curves
- Types of Curves
- Bezier Curves and Surfaces
- B-Spline Curves and Surfaces
- Data Structures For Graphics
- Triangle Meshes
- Scene Graphs
- Spatial Data Structure
- Binary Space Partitioning
- Tiling Multidimensional Arrays
- Color Theory
- Colorimetry
- Chromatic Adaptation
- Color Appearance
- Antialiasing
- Ray Tracing
- Ray Tracing Algorithm
- Perspective Ray Tracing
- Computing Viewing Rays
- Ray-Object Intersection
- Shading in Ray Tracing
- Transparency and Refraction
- Constructive Solid Geometry
- Texture Mapping
- Texture Values
- Texture Coordinate Function
- Antialiasing Texture Lookups
- Procedural 3D Textures
- Reflection Models
- Real-World Materials
- Implementing Reflection Models
- Specular Reflection Models
- Smooth-Layered Model
- Rough-Layered Model
- Surface Shading
- Diffuse Shading
- Phong Shading
- Artistic Shading
- Computer Animation
- Computer Animation
- Keyframe Animation
- Morphing Animation
- Motion Path Animation
- Deformation Animation
- Character Animation
- Physics-Based Animation
- Procedural Animation Techniques
- Computer Graphics Fractals
Diffuse Shading in Computer Graphics
One of the most commonly used shading techniques is diffuse shading. This is useful for representing surfaces that do not have a shiny appearance, like matte objects.
In this chapter, we will see the basics of diffuse shading and discuss its implementation with examples based on Lambertian objects, which follow Lambert's cosine law. We will also introduce concepts like ambient shading and vertex-based diffuse shading.
What is Diffuse Shading?
Diffuse shading is for matte surfaces. It is widely used to represent paper, wood, or unpolished stone, where the object's color does not change significantly when viewed from different angles. This kind of shading gives the object a flat, non-shiny appearance.
Matte surfaces are modelled as Lambertian objects. It means they scatter light uniformly in all directions, regardless of the viewing angle.
A significant characteristic of diffuse shading is that the surface color remains relatively constant, even when the viewer's position changes. In computer graphics, this effect is achieved using Lambert’s cosine law.
Lambertian Shading Model
The Lambertian shading model is based on Lambert's cosine law. This dictates that the intensity of light on a surface is proportional to the cosine of the angle between the surface normal and the direction of the light source.
Mathematically, the relationship is expressed as −
$$\mathrm{c \propto \cos \theta}$$
This can be converted into vector form, where n is the surface normal, and l is the direction of the light −
$$\mathrm{c \propto n \cdot l}$$
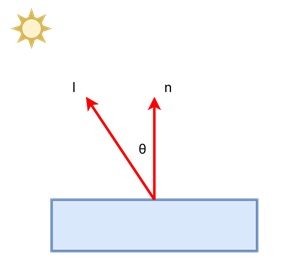
In this formula, both vectors are normalized, meaning they have a length of one. The color on the surface depends on the cosine of the angle between these vectors.
When the light hits the surface directly, the angle between the light direction and the normal is zero, making the cosine of the angle one, resulting in maximum brightness. As the angle increases, the cosine decreases, and so does the brightness.
For example, consider a flat surface that is directly under a light source. The normal of the surface is pointing upwards, and the light source is positioned directly above it. In this case, the angle between the normal and the light is zero, so the surface will appear brightest at this point. If the surface is tilted, the angle increases, and the surface becomes dimmer.
Handling Reflectance and Light Intensity
In real-world applications, a surface's reflectance and the intensity of the light source affect how light interacts with the surface. The diffuse reflectance, denoted as cr, represents how much light is reflected by the surface.
To model this, we adjust the Lambertian model by introducing the reflectance cr and the light intensity cl −
$$\mathrm{c = cr \cdot cl \cdot n \cdot l}$$
This equation shows that the surface color depends not only on the angle of the light but also on the reflectance and intensity. However, this can sometimes lead to values outside the valid color range (0 to 1), especially when the surface is pointing away from the light.
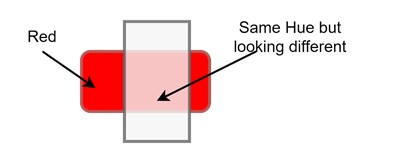
For example, imagine a red surface under a white light. The surface reflects more red light, so cr for the red component will be higher. If the light intensity increases, the surface will appear brighter, but it will still have the same overall red hue.
Avoiding Negative Light with the Max Function
When the surface is pointing away from the light, the dot product n · l becomes negative. A surface in shadow should not receive negative light, so we modify the equation by introducing a max function to ensure that the color value is never negative −
$$\mathrm{c \:=\: cr \:\cdot\: cl \:\cdot\: \max(0,\: n \:cdot\: l)}$$
This approach makes sure that surfaces pointing away from the light are not illuminated, maintaining a realistic lighting model.
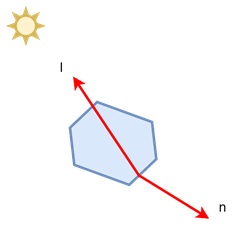
Two-Sided Lighting
In some cases, we may want to simulate light hitting the surface from both sides. For instance, if light comes from behind the object, we can use the absolute value of the dot product to allow both sides of the surface to receive light −
$$\mathrm{c \:=\: cr \:\cdot\: cl \:\cdot\: \left| n \:\cdot\: l \right|}$$
This is known as two-sided lighting, where we assume that two opposing light sources are illuminating the surface from both directions.
For example, picture a sheet of paper being illuminated from both sides by two lamps. Using two-sided lighting, we can see that both the front and back of the paper reflect light, even when viewed from different angles.
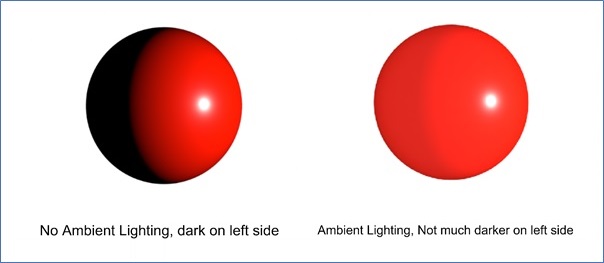
Ambient Shading
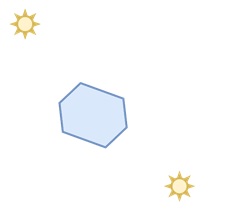
Another interesting thing is the diffuse shading on its own can lead to points on the surface being completely black when facing away from the light. However, in reality, light is reflected from all directions due to multiple light sources or environmental lighting, such as skylight. To account for this, we introduce ambient shading.
Ambient shading adds a constant light to all parts of the object, regardless of the direction of the light source −
$$\mathrm{c \:=\: cr \:\cdot\: \left( ca \:+\: cl \:\cdot\: \max(0,\: n \:\cdot\: l) \right)}$$
The term ca represents the ambient light in the environment. This prevents any point from being entirely black by ensuring every point receives some light.
Vertex-Based Diffuse Shading
To avoid faceted appearances for objects made of triangles, we can apply diffuse shading at each vertex of the object. Instead of calculating the shading per face, vertex-based diffuse shading uses the normals at the vertices of the object to smooth the shading across the surface. This method provides a more realistic and visually appealing effect.
For example, consider a low-polygon 3D model of a sphere. Without vertex shading, the model will look like a collection of flat triangles. By applying vertex-based shading, we can smooth the appearance, making the model look more like a real sphere.
Conclusion
In this chapter, we explained the basics of diffuse shading in computer graphics. We understood diffuse shading and how it applies to matte surfaces. We also understood the Lambertian shading model and how light intensity and reflectance affect shading. We discussed how to avoid negative light values and two-sided lighting.
Ambient shading was presented as a solution for handling indirect light, and finally, we looked at vertex-based diffuse shading as a way to smooth the appearance of faceted objects.