- Computer Graphics - Home
- Computer Graphics Basics
- Computer Graphics Applications
- Graphics APIs and Pipelines
- Computer Graphics Maths
- Sets and Mapping
- Solving Quadratic Equations
- Computer Graphics Trigonometry
- Computer Graphics Vectors
- Linear Interpolation
- Computer Graphics Devices
- Cathode Ray Tube
- Raster Scan Display
- Random Scan Device
- Phosphorescence Color CRT
- Flat Panel Displays
- 3D Viewing Devices
- Images Pixels and Geometry
- Color Models
- Line Generation
- Line Generation Algorithm
- DDA Algorithm
- Bresenham's Line Generation Algorithm
- Mid-point Line Generation Algorithm
- Circle Generation
- Circle Generation Algorithm
- Bresenham's Circle Generation Algorithm
- Mid-point Circle Generation Algorithm
- Ellipse Generation Algorithm
- Polygon Filling
- Polygon Filling Algorithm
- Scan Line Algorithm
- Flood Filling Algorithm
- Boundary Fill Algorithm
- 4 and 8 Connected Polygon
- Inside Outside Test
- 2D Transformation
- 2D Transformation
- Transformation Between Coordinate System
- Affine Transformation
- Raster Methods Transformation
- 2D Viewing
- Viewing Pipeline and Reference Frame
- Window Viewport Coordinate Transformation
- Viewing & Clipping
- Point Clipping Algorithm
- Cohen-Sutherland Line Clipping
- Cyrus-Beck Line Clipping Algorithm
- Polygon Clipping Sutherland–Hodgman Algorithm
- Text Clipping
- Clipping Techniques
- Bitmap Graphics
- 3D Viewing Transformation
- 3D Computer Graphics
- Parallel Projection
- Orthographic Projection
- Oblique Projection
- Perspective Projection
- 3D Transformation
- Rotation with Quaternions
- Modelling and Coordinate Systems
- Back-face Culling
- Lighting in 3D Graphics
- Shadowing in 3D Graphics
- 3D Object Representation
- Represnting Polygons
- Computer Graphics Surfaces
- Visible Surface Detection
- 3D Objects Representation
- Computer Graphics Curves
- Computer Graphics Curves
- Types of Curves
- Bezier Curves and Surfaces
- B-Spline Curves and Surfaces
- Data Structures For Graphics
- Triangle Meshes
- Scene Graphs
- Spatial Data Structure
- Binary Space Partitioning
- Tiling Multidimensional Arrays
- Color Theory
- Colorimetry
- Chromatic Adaptation
- Color Appearance
- Antialiasing
- Ray Tracing
- Ray Tracing Algorithm
- Perspective Ray Tracing
- Computing Viewing Rays
- Ray-Object Intersection
- Shading in Ray Tracing
- Transparency and Refraction
- Constructive Solid Geometry
- Texture Mapping
- Texture Values
- Texture Coordinate Function
- Antialiasing Texture Lookups
- Procedural 3D Textures
- Reflection Models
- Real-World Materials
- Implementing Reflection Models
- Specular Reflection Models
- Smooth-Layered Model
- Rough-Layered Model
- Surface Shading
- Diffuse Shading
- Phong Shading
- Artistic Shading
- Computer Animation
- Computer Animation
- Keyframe Animation
- Morphing Animation
- Motion Path Animation
- Deformation Animation
- Character Animation
- Physics-Based Animation
- Procedural Animation Techniques
- Computer Graphics Fractals
Clipping Techniques for Curve and Exterior in Computer Graphics
In the last few chapters, we covered line clipping and polygon clipping algorithms. We also covered text clipping. There is another set of algorithms available for curve clipping and exterior clippings. In this chapter, we will focus on these two important techniques, curve clipping and exterior clipping. We will discuss how these techniques work, their use cases, and provide examples for a better understanding.
What is Curve Clipping?
Curve clipping is a process to clip curves, such as circles or ellipses. These to fit within a rectangular clipping window. Unlike straight lines, curves require additional computation to determine which parts lie inside or outside the window. The basic idea of curve clipping is similar to line clipping but with more complex calculations.
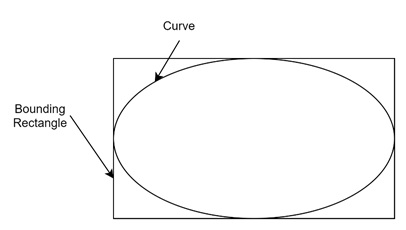
Steps in Curve Clipping
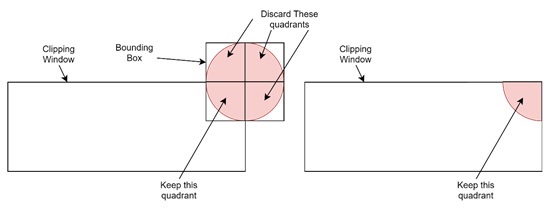
When clipping a curve, we first draw a bounding rectangle around the object. This rectangle helps to approximate the curve's extent and simplifies the clipping process.
The clipping process for curves can be divided into three main cases −
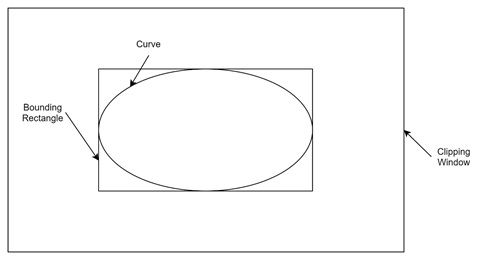
1. Bounding Rectangle Completely Inside the Window
If the bounding rectangle of the curve is completely inside the clipping window, the entire curve is accepted without any further computation. This is the simplest case.
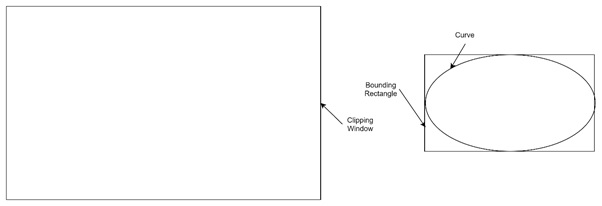
2. Bounding Rectangle Completely Outside the Window
If the bounding rectangle is completely outside the clipping window, the entire curve is rejected. Since no part of the curve lies within the window, there is no need to perform additional calculations.
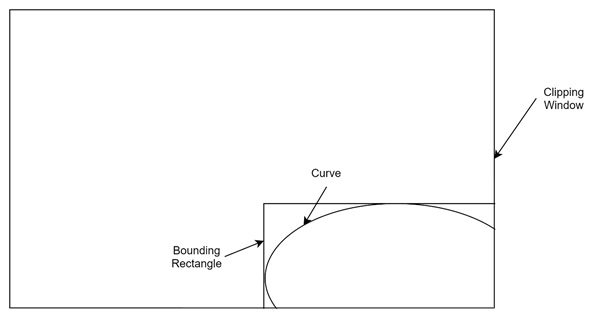
3. Partial Overlap
If the bounding rectangle partially overlaps with the clipping window, further calculations are required. This case is more complex because some parts of the curve are inside the window while others are outside. In this case, we use specific techniques depending on the shape of the curve.
Handling Different Types of Curves
Depending on the type of curve (e.g., circle or ellipse), we use different approaches for further clipping when the bounding rectangle overlaps the window.
- Circle Clipping − For circles, we use the quadrants of the circle to determine which parts of the curve lie inside the window. The circle is divided into four quadrants, and the parts that overlap with the window are saved while the rest are discarded. If necessary, the curve can be subdivided further into octants for finer clipping.
- Ellipse Clipping − For ellipses, the curve is divided into quadrants similar to circles. We calculate which parts of the ellipse are inside the window by extending the coordinates of each quadrant. The sections that lie outside the clipping window are discarded, while the sections inside the window are displayed.
What is Exterior Clipping?
Exterior clipping is the opposite of the typical clipping process. While traditional clipping removes parts of objects outside the window and keeps the parts inside. On the other hand exterior clipping removes the parts inside the window and keeps the parts that are outside. This technique is useful in cases where we need to display objects that are outside a defined region. Sometimes for when there are overlapping objects that require both internal and external clipping.
Use Cases of Exterior Clipping
Exterior clipping is commonly used in multiple-window systems, where several windows overlap on the screen. To display these windows correctly, we may need to apply both internal and external clipping. The exterior clipping states that objects that fall outside certain windows are still visible, but those inside are removed.
Other applications of exterior clipping include −
- Page layout design − In advertising or publishing, we may want to display labels or design patterns outside a defined region.
- Overlapping graphs or maps − Exterior clipping can help combine multiple layers of information while ensuring that the objects outside a specific region are visible.
- Inserting images or objects − We may use exterior clipping to provide space for inserts into larger images or pictures, ensuring that the outside elements are visible.
Procedure for Exterior Clipping
The process of exterior clipping is similar to traditional clipping, but instead of discarding the parts outside the window, we discard the parts inside. The steps for exterior clipping are as follows −
- Define the Clipping Window − Start by defining the region where clipping will take place. This is the area that we want to exclude, and we will keep everything outside it.
- Check Overlap − Check if the objects overlap with the window. If an object lies entirely outside the window, it is saved. If it lies entirely inside, it is discarded.
- Clip the Overlapping Parts − For objects that partially overlap the window, we clip the part inside the window and keep the part outside. This ensures that only the exterior portions are displayed.
Example of Exterior Clipping
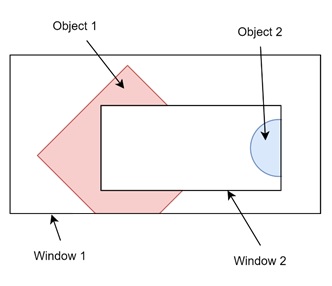
Let us see the following example, there are two windows. The outer window is bigger and inner window is smaller. These two windows are overlapping. The object 1 is inside the window 1 and it is interior clipped with respect to window 1, so that the bottom part is clipped. But since it has overlapping window 2, the region covered by window 2 is clipped. That is the exterior clipping. But blue circle is inside the inner circle so it is interior clipped.
Exterior Clipping with Concave Windows
Exterior clipping can also be applied to concave windows. As we know a concave window is a polygon with inward-facing edges, unlike convex polygons where all edges face outward. Clipping against a concave window requires a two-step process:
- Internal Clipping − First, clip the object to the interior of a convex polygon that approximates the concave window.
- External Clipping − Next, clip the object to the exterior of the concave window to ensure that only the part of the object outside the window remains visible.
For example, consider a line segment that passes through a concave polygon. The first step clips the line to the interior of the polygon, while the second step clips it to the exterior, leaving only the desired segment visible.
Conclusion
In this chapter, we explained the concept of curve clipping and exterior clipping in detail. Curve clipping helps manage curved objects like circles and ellipses by dividing them into quadrants or octants for finer control. Exterior clipping, on the other hand, is used to clip objects outside a specified region, making it useful for multiple-window systems, page layout design, and other applications that require overlapping or background elements.