- Computer Graphics - Home
- Computer Graphics Basics
- Computer Graphics Applications
- Graphics APIs and Pipelines
- Computer Graphics Maths
- Sets and Mapping
- Solving Quadratic Equations
- Computer Graphics Trigonometry
- Computer Graphics Vectors
- Linear Interpolation
- Computer Graphics Devices
- Cathode Ray Tube
- Raster Scan Display
- Random Scan Device
- Phosphorescence Color CRT
- Flat Panel Displays
- 3D Viewing Devices
- Images Pixels and Geometry
- Color Models
- Line Generation
- Line Generation Algorithm
- DDA Algorithm
- Bresenham's Line Generation Algorithm
- Mid-point Line Generation Algorithm
- Circle Generation
- Circle Generation Algorithm
- Bresenham's Circle Generation Algorithm
- Mid-point Circle Generation Algorithm
- Ellipse Generation Algorithm
- Polygon Filling
- Polygon Filling Algorithm
- Scan Line Algorithm
- Flood Filling Algorithm
- Boundary Fill Algorithm
- 4 and 8 Connected Polygon
- Inside Outside Test
- 2D Transformation
- 2D Transformation
- Transformation Between Coordinate System
- Affine Transformation
- Raster Methods Transformation
- 2D Viewing
- Viewing Pipeline and Reference Frame
- Window Viewport Coordinate Transformation
- Viewing & Clipping
- Point Clipping Algorithm
- Cohen-Sutherland Line Clipping
- Cyrus-Beck Line Clipping Algorithm
- Polygon Clipping Sutherland–Hodgman Algorithm
- Text Clipping
- Clipping Techniques
- Bitmap Graphics
- 3D Viewing Transformation
- 3D Computer Graphics
- Parallel Projection
- Orthographic Projection
- Oblique Projection
- Perspective Projection
- 3D Transformation
- Rotation with Quaternions
- Modelling and Coordinate Systems
- Back-face Culling
- Lighting in 3D Graphics
- Shadowing in 3D Graphics
- 3D Object Representation
- Represnting Polygons
- Computer Graphics Surfaces
- Visible Surface Detection
- 3D Objects Representation
- Computer Graphics Curves
- Computer Graphics Curves
- Types of Curves
- Bezier Curves and Surfaces
- B-Spline Curves and Surfaces
- Data Structures For Graphics
- Triangle Meshes
- Scene Graphs
- Spatial Data Structure
- Binary Space Partitioning
- Tiling Multidimensional Arrays
- Color Theory
- Colorimetry
- Chromatic Adaptation
- Color Appearance
- Antialiasing
- Ray Tracing
- Ray Tracing Algorithm
- Perspective Ray Tracing
- Computing Viewing Rays
- Ray-Object Intersection
- Shading in Ray Tracing
- Transparency and Refraction
- Constructive Solid Geometry
- Texture Mapping
- Texture Values
- Texture Coordinate Function
- Antialiasing Texture Lookups
- Procedural 3D Textures
- Reflection Models
- Real-World Materials
- Implementing Reflection Models
- Specular Reflection Models
- Smooth-Layered Model
- Rough-Layered Model
- Surface Shading
- Diffuse Shading
- Phong Shading
- Artistic Shading
- Computer Animation
- Computer Animation
- Keyframe Animation
- Morphing Animation
- Motion Path Animation
- Deformation Animation
- Character Animation
- Physics-Based Animation
- Procedural Animation Techniques
- Computer Graphics Fractals
Flood Fill Algorithm in Computer Graphics
The Flood Filling Algorithm fills the internal region which is bounded by pixels with different colors. This algorithm works by starting from a point inside the polygon and spreading outwards until the boundaries are reached.
Read this chapter to learn the basics of the flood fill algorithm and how it is applied in polygon filling. We will also go through a step-by-step example for a better understanding.
Flood Fill Algorithm: The Basics
The flood fill technique is used to fill an area of connected pixels bounded by different colors. It is called "flood fill" because it behaves like water flooding over a surface, filling all the connected areas until it reaches a boundary.
In simpler terms, it works like pouring paint into a specific area and spread until the entire connected region is covered. Instead of directly looking for the boundary color, the algorithm searches for and replaces a specific interior color.
Key Features of Flood Fill Algorithm
Let us see some of the components of flood-fill algorithm −
- Seed Point − This is the starting point inside the polygon where the filling process begins, it can be any point inside the polygon.
- Boundary Condition − The algorithm stops when it reaches the edges or boundaries of the polygon.
- Recursion or Stack-Based − The algorithm can be implemented recursively or using an explicit stack to avoid deep recursion issues.
Types of Flood Fill Algorithms
There are two types of filling depending on the specific requirement −
1. 4-Connected Flood Fill
In this approach, each pixel has four neighbours: right, left, above, and below. The algorithm checks these four neighbouring pixels to decide whether to fill them.
2. 8-Connected Flood Fill
This approach is more comprehensive, allowing each pixel to have eight neighbours. In addition to the four neighbours from the 4-connected method, it also checks the diagonal neighbours (top-right, top-left, bottom-right, and bottom-left).
How Does the Flood Fill Algorithm Work?
The flood-fill algorithm operates by selecting a seed point and checking the color of all the neighbouring pixels. If a neighbouring pixel has the same color as the selected one, it gets filled with a new color. This process continues, spreading outward until it hits a boundary.
It generally uses a random color to fill the internal region then after filling, replace the colors with specified color given as input to the algorithm.
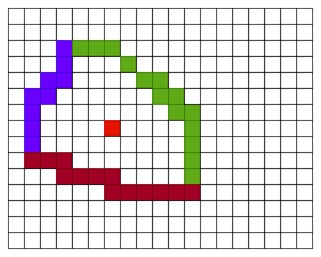
Let us see the example of how 4-connected flood filling is working with. Initially we have a polygon with blue green and brown boundary colors.

Now, pick a seed at center and its color is red.
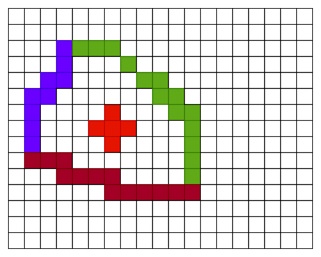
After that, it will expand using 4-connected pixels and nearest 4 pixels are turned red.
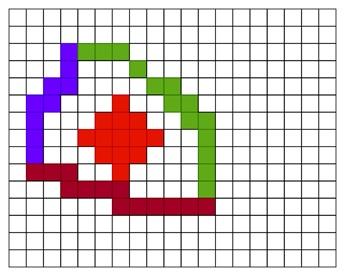
Then again the 4 connected pixels of the newly colored pixels will be turned red but here all pixels which are colored before will not be affected.
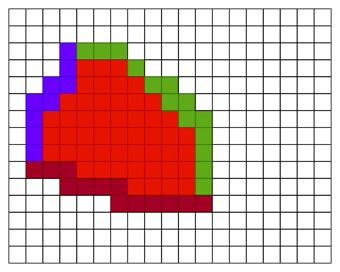
And finally, it will be filled like below −
We have understood how this is working. Let us see this formally.
- Start at the Seed Point − Select a point inside the region that needs to be filled.
- Check Neighbouring Pixels − Check the surrounding pixels (either 4 or 8-connected) and see if they share the same color as the seed pixel.
- Fill Pixels − Replace the color of the neighbouring pixels with the new fill color if they match the target color.
- Repeat − Continue this process for each pixel that gets filled, checking its neighbours, until the entire region is covered and no more matching pixels are found.
The algorithm works recursively, so that it calls itself for each neighbouring pixel that needs to be filled. However, recursion can sometimes lead to stack overflow in large areas. To avoid this, an iterative version using a stack can be employed.
Recursive Algorithm
Let us see the recursive algorithm −
FloodFill(x, y, targetColor, fillColor):
    If the pixel at (x, y) is not targetColor or is already fillColor:
        Return
    Set the pixel at (x, y) to fillColor
    FloodFill(x+1, y, targetColor, fillColor)  // Right
    FloodFill(x-1, y, targetColor, fillColor)  // Left
    FloodFill(x, y+1, targetColor, fillColor)  // Down
    FloodFill(x, y-1, targetColor, fillColor)  // Up
Also see the iterative approach −
FloodFill(x, y, targetColor, fillColor):
    Create an empty stack
    Push (x, y) onto the stack
    While the stack is not empty:
        Pop (currentX, currentY) from the stack
        If the pixel at (currentX, currentY) is targetColor:
            Set the pixel at (currentX, currentY) to fillColor
            Push the neighboring pixels (left, right, up, down) onto the stack
Advantages and Disadvantages of Flood Fill Algorithm
The following table highlights the advantages and disadvantages of using the Flood Fill algorithm −
| Advantages | Disadvantages |
|---|---|
| Simple to implement − The algorithm is easy to code and understand. | Memory intensive − Flood-fill requires significant memory, especially when filling large areas or using a recursive approach. |
| Efficient for irregular regions − It can fill irregular shapes where the boundaries are not clear-cut. | Slow performance − The algorithm can be slower compared to other filling algorithms, especially if the region is large. |
Conclusion
In this chapter, we covered the basic concepts of the Flood Fill Algorithm and how it is applied to fill the interior of polygons. We also explained its types, the process it follows, and the difference between recursive and iterative implementations. In addition, we looked at an example wherein we picked a polygon and filled it with 4-connected polygon filling approach to understand the concept beter.